Shortcuts
If you want to skip certain parts of the text adventure, here are some shortcuts you can paste into the prompt to reach certain checkpoints:
| Command | Description |
|---|
| d. se. x bottle. take bottle. se. se. x jar. take jar. se. sw. x wire. take wire. sw. sw. x vial. take vial. sw. nw. x flask. take flask. nw. nw. x crystals. take crystals. nw. ne. x bowl. take bowl. ne. ne. look beaker. take beaker. ne. se. se. sw. sw. i. | Starting from the basement entrance, visits all the rooms with signs and ingredients, collecting ingredients along the way, and ends at the center room with the cauldrons. |
| put strontium in red. put spirits in red. put copper in blue. put chlorine in blue. put caustic in yellow. put dry ice in yellow. put periclase in white. put oil in white. look. | Starting from the cauldron room, puts the ingredients into each of the cauldrons, making all 4 fireworks, and unlocks the 4 hidden areas. |
| n. nw. ne. se. sw. s. | Starting from the cauldron (center) room, visits the Northern hidden rooms and returns to the cauldron (center) room. |
| e. ne. se. sw. nw. w. | Starting from the cauldron (center) room, visits the Eastern hidden rooms and returns to the cauldron (center) room. |
| s. se. sw. nw. ne. n. | Starting from the cauldron (center) room, visits the Southern hidden rooms and returns to the cauldron (center) room. |
| w. sw. nw. ne. se. e. | Starting from the cauldron (center) room, visits the Western hidden rooms and returns to the cauldron (center) room. |
Part 1: Exploring the Basement
This puzzle is presented as a text adventure themed around exploring the witch’s basement. The following commands are useful for exploring the map (and grabbing useful stuff):
- Visit rooms by typing go [direction], e.g. go southeast or simply se.
- Things can be e[x]amined by typing x [thing] or look [thing].
- Things can be taken by typing take [thing]. You can see what you're currently holding by typing i (stands for inventory).
- (Typing scream, help, or scream for help prints a dialogue explaining the commands above.)
The overall shape of the map is a diamond. Initially, the following rooms are accessible:
- The Basement Entrance, which is the starting point. (See top of map below.)
- 9 rooms that have signs with weird descriptions. (See cells with red borders in the map below.)
- 8 rooms with ingredients. Ingredients can be examined with x [ingredient] and taken with take [ingredient].
- 4 rooms leading to the center each have a word written on the wall.
- The center room, which has a sign as well as 4 colored cauldrons: red, blue, yellow, and white.
- (There are some more rooms, but they are not yet accessible.)
- (There is 1 additional room that exists just for fun (as an easter egg). At the Basement Entrance, you can choose to turn back, which leads you to a room where you can take a nap.)
Part 2: Making Fireworks (or, Throwing Stuff Into Cauldrons)
In the center room, solvers can put ingredients into cauldrons with: put [ingredient] into [color]. Each cauldron accepts 2 ingredients - but which ingredients should go in which cauldrons?
The clue for what to put in each cauldron is spelled out by the 4 rooms leading to the center, which spell out "TRY MAKING FIREWORKS" when read clockwise.
It turns out that each ingredient can be paired with another ingredient to form a chemical that is used to make a specific colored firework. For example, Strontium Hydroxide and Spirits of Salt when mixed can make Strontium Chloride, which can be used to produce red fireworks (byproducts are ignored). These 2 ingredients should be put into the red cauldron (order doesn’t matter).
| Cauldron (Firework color) | Ingredient 1 | Ingredient 2 | Resultant Chemical | Num Fireworks (Enum) |
|---|
| Red | Strontium Hydroxide
Sr(OH)₂ | Spirits of Salt
HCl (aka Hydrochloric Acid) | Strontium Chloride
SrCl₂ | 9 8 |
| Blue | Copper Wire
Cu (mainly) | Chlorine Gas
Cl₂ | Copper(II) Chloride
CuCl₂ | 6 2 8 |
| Yellow | Caustic Soda
NaOH (aka Sodium Hydroxide) | Dry Ice
CO₂ (aka Carbon Dioxide) | Sodium Bicarbonate
NaHCO₃ (aka Baking Soda) | 6 11 |
| White | Periclase
MgO (aka Magnesium Oxide) | Oil of Vitriol
H₂SO₄ (aka Sulfuric Acid) | Magnesium Sulfate
MgSO₄ (aka Epsom Salt) | 9 7 |
If an incorrect pair of ingredients is put into a cauldron, it is rejected and spit back out into the player's bag (so they can try again, without needing to restart).
When a mixture is correctly identified:
- Some number of (celebratory) fireworks will shoot out of the cauldron. The number of fireworks matches the enumeration of the resultant chemical that was formed, as confirmation (since the resultant chemicals are not given, and should be identified).
- A hidden room will open up from the (north, east, south, or west) wall.
(Side Note: It is possible (and OK) to brute force the chemical pairs, but identifying the resulting chemicals will still be necessary for a later step.)Part 3: Hidden Rooms!
Once all the cauldrons are satisfied with their respective ingredients, a total of 16 new rooms are now accessible:
- Each wall of the center room (North, East, South, West) opens up to 4 rooms, each describing a habitat of lava, water, desert, or snow.
- They all have some symbols or words on the wall, plus symbols that seem to form an equation.
Part 4: Identifying the Signs
So, what's up with all these rooms?
When each set of hidden rooms is read clockwise (starting from the room connected to the center), they spell 4 messages:
- USE EACH ROOM’S "❖" NUMBER
- WITH ADJACENT "⟐" NUMBER
- SUM ADJACENT "❖⟐❖" EQUATIONS
- INDEX WIKIPEDIA’S "⟐" NAMES
At this point, it would be useful to determine what the "❖" and "⟐" symbols mean. There are a few possible break-ins for each:| ❖ | ⟐ |
|---|
Break-ins- Each group of hidden rooms has the same layout, and also resembles the "❖" symbol (which is similarly composed of 4 small diamonds).
- Each room is described by an environment that has a strong association with a specific color: lava = red, water = blue, desert = yellow, and snow = white. The colors are also always in the same relative positions.
- While researching the firework chemicals, we might stumble upon some chemical safety data sheets that have some signs that match the clues above...
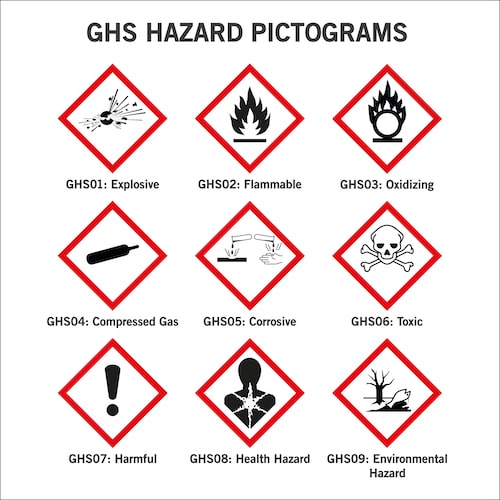
| Break-ins- We still haven't used the signs with the weird descriptions yet. Taking a hint from the symbol, we might want to look for diamond-shaped signs.
- At the basement entrance, there was a sign that said "DANGER: Gruesome Horrific Science inside.", which notably has some strange capitalization: GHS.
- While researching the firework chemicals, we might stumble upon some chemical safety data sheets that have some signs that match the clues above...
|
The Aha
Each group of hidden rooms resembles an NFPA Fire Diamond!
| The Aha
Each weirdly described sign is a GHS Hazard Pictogram!
|
Part 5: Solving the Equations and Extracting the Answer
With the signs identified, we can now take a stab at understanding the messages:
| USE EACH ROOM’S "❖" NUMBER | - Each hidden room (based on its position and color) is a specific sub-diamond of an NFPA Fire Diamond.
- Each NFPA sub-diamond (and consequently, hidden room) is associated with a hazard number 0-4 (except for white — but observant solvers might notice that white rooms never have a ❖ symbol, so we don't have to worry about white).
- We should use the NFPA Fire Diamonds associated with the Resultant Chemicals (firework chemicals) that we found above.
- For example, Strontium Chloride's wikipedia page shows an NFPA diamond where blue=2, red=0, yellow=0, and white=[blank]. Since Strontium Chloride (red) opened up the Northern hidden rooms, those hidden rooms will use these numbers.
- (Side note: different chemical manufacturers sometimes disagree about NFPA ratings. This puzzle uses Wikipedia as the canonical source. The equations are designed to either output the same number, or a nonsensical (non-integer or divide-by-zero) number, if other technically valid hazard numbers are used.)
|
| WITH ADJACENT "⟐" NUMBER | - Notice that each hidden room (on the puzzle's map) is adjecent to exactly 1 of the rooms with a weird sign.
- We should identify which sign is which GHS Hazard Pictogram, and notice that each sign has a code: GHS0X, where X is a number 1-9.
- These numbers can be substitued into the "⟐" symbol for each hidden room's equation.
|
| SUM ADJACENT "❖⟐❖" EQUATIONS | - After solving the equation in each hidden room, we should note (based on the last message) that we want to index into each GHS Hazard sign's name.
- Changing our perspective, each GHS Hazard sign room is adjacent to 1 or more hidden rooms. (The rooms at the 4 compass point corners each are adjacent to 1 room; the center room is adjacent to 4 rooms, and the rest are adjacent to 2 rooms.)
- For each GHS Hazard sign room, sum the resultant equation numbers to get a final number.
|
| INDEX WIKIPEDIA’S "⟐" NAMES | - Whew, almost there! The last step is to index the number we got from the previous step into the name of each GHS Hazard sign.
- As directed, we should use the name that appears on the GHS Hazards Pictogram Wikipedia page (since the names are not actually standardized).
|
Finally, read the letters in clockwise order (with the center room last), to spell out the answer: OFF LIMITS.Final Grid
The final grid is summarized here:
Authors' Notes
Huge thank you to Dan for helping me get this puzzle to work.
There are a lot of things with this puzzle I’m very satisfied with:
- The fire connection between fireworks and fire diamonds
- Using 2 different sets of diamond-shaped safety symbols (and finding unicode symbols that matched them pretty well!)
- Putting 4 mini diamonds inside my big fat diamond, each of which is also made of 4 smaller diamonds
- Using red/blue/yellow/white in multiple ways (firework colors and NFPA)
- Writing from the perspective of a child (floor is lava, doing experiments by throwing stuff in a pot, wild imagination)
- Describing the GHS signs
But there were also a lot of difficulties and annoyances we had to go through to construct it:
- The fact that white isn’t assigned a number in NFPA diamonds made extraction asymmetric
- The fact that there exist different NFPA ratings from different companies for each chemical (why isn’t this standardized!?)... we used Wikipedia as the canonical source, and mitigated using other (valid) NFPA ratings by either making the equations work with either input, or making the unintended one yield a bad value (non-integer or divide by zero)
- The fact that most of the NFPA numbers were 0 or very similar to one another
- How hard it was to find a suitable chemical for white fireworks (the original version of the puzzle used just Magnesium for white, which is closer to the real world but made that chemical formula trivial) (and just how hard it is to make white fire in general) (Magnesium Sulfate isn’t used for white fireworks, but can produce a white flame, and is close enough to the truth to be acceptable)
- Coding with Inform7, which is a very strange language; surprisingly versatile, but sometimes frustrating.
Some things I wish I could have included in an alternate universe:
- Some connection to Hanabi, which also uses fireworks (with these colors! … plus green)
- Using nitromethane for white fire (referencing NileRed’s video) (I couldn’t decide whether to canonically use pyrotechnic colorants or colored fire as the primary source)
- Making mini-puzzles to collect the ingredients (e.g. do a small task, find a key, unlock a cabinet, etc.)
- Including my inspiration for the puzzle (thanks DW):
Thank you Pepsimen for making my day: